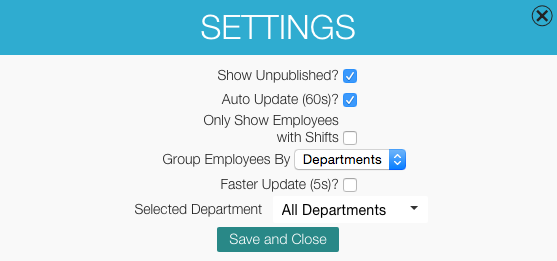
Print View Settings
The Print View has a number of settings that you can use to optimize your use of the print view for different things. If you are having issues, try this troubleshooting information and FAQ post.
To access the settings, open up Print View and click the Settings button in the header (upper right corner).
Description of the Settings:
- Show Unpublished – Defaults to YES, which means that you will see all shifts that are published as well as those that are unpublished
- Auto Update – Defaults to YES, which means the system will make shifts appear on the print view as you build the schedule. It takes one minute for the shift to appear.
- Show Only Employees with Shifts: Check yes to remove all employees from the display who are not currently scheduled to work.
- Group Employees By: (Default is Departments, which puts the department names on the left side of the display and allows for employees to be scheduled within multiple departments. IE, you might see and employee’s name listed in two or more departments, provided that they have positions in both departments. If it is NOT grouped by Departments, it is simply an alphabetical list of employees and their shifts.
- Faster Update – Defaults to NO. Click and check the setting to cause the shifts to appear and update every 5 seconds (recommended for when you use print view as you build) If you toggle between weeks using the < > in the header, this setting WILL RESET to NO. You will need to recheck the setting to make the shifts show up quickly. The reason we do this is to save server time and make the experience much faster for you in other parts of the app for when you don’t need it to go fast (when you are not looking at it)
- Selected Department – Defaults to ALL Departments. If you want to choose only one department to view at a time, you can use the dropdown to select one.
